Nginx Nedir? Neden Kullanılır?
Nginx, temel olarak açık kaynaklı ve yüksek performanslı bir web sunucusudur. Ancak işlevi yalnızca bununla sınırlı değildir; aynı zamanda bir reverse proxy olarak da görev yapar. Reverse proxy, istemciden gelen talepleri alarak bunları arka plandaki sunuculara yönlendiren bir katmandır. Bu sayede istemci, doğrudan uygulama sunucusuyla değil, Nginx aracılığıyla iletişime geçer.
Nginx, özellikle bir domain’i belirli bir IP adresiyle eşleştirip SSL üzerinden güvenli bağlantılar kurmak istediğimizde sıkça tercih edilir. Bununla birlikte; yük dengeleme (load balancing), önbellekleme (caching), statik dosya sunumu ve bazı e-posta servisleri için proxy desteği gibi birçok gelişmiş özelliği de destekler.
Kurulum
Aşağıdaki komutları linux ortamda çalıştırarak NGINX kurabilirsiniz.
sudo apt update && sudo apt upgrade -y
# install nginx
sudo apt install nginx -y
# run nginx
sudo systemctl start nginx
# auto start nginx on startup
sudo systemctl enable nginx
# check status
sudo systemctl status nginx

## Util commands
# check configuration file syntax is correct
sudo nginx -t
# restart nginx
sudo systemctl restart nginx
# or both same line
nginx -t && systemctl reload nginx
# check error logs
sudo tail -f /var/log/nginx/error.log
Nginx Konfigurasyon
Nginx, çoğunlukla /etc/nginx dizini altında konumlanır. Bu dizine gittiğimizde:
root@localhost:/etc/nginx# ll
total 76
drwxr-xr-x  8 root root 4096 Mar 16 17:14 .
drwxr-xr-x 95 root root 4096 Mar 16 09:44 ..
drwxr-xr-x  2 root root 4096 Mar 14  2023 conf.d
-rw-r--r--  1 root root 1125 Mar 14  2023 fastcgi.conf
-rw-r--r--  1 root root 1055 Mar 14  2023 fastcgi_params
-rw-r--r--  1 root root 2837 Mar 14  2023 koi-utf
-rw-r--r--  1 root root 2223 Mar 14  2023 koi-win
-rw-r--r--  1 root root 4338 Mar 14  2023 mime.types
drwxr-xr-x  2 root root 4096 Mar 14  2023 modules-available
drwxr-xr-x  2 root root 4096 Mar 14  2023 modules-enabled
-rw-r--r--  1 root root 1762 Mar 16 17:14 nginx.conf
-rw-r--r--  1 root root  180 Mar 14  2023 proxy_params
-rw-r--r--  1 root root  636 Mar 14  2023 scgi_params
drwxr-xr-x  2 root root 4096 Mar 16 17:11 sites-available
drwxr-xr-x  2 root root 4096 Apr 16 15:07 sites-enabled
drwxr-xr-x  2 root root 4096 Mar 16 09:32 snippets
-rw-r--r--  1 root root  664 Mar 14  2023 uwsgi_params
-rw-r--r--  1 root root 3071 Mar 14  2023 win-utf
şeklinde bir çok dosya va dizin ile karşılaşırız. Burada bizi ilgilendiren en önemli kısımlar nginx.conf dosyası, sites-enabled ve sites-available dizinleridir.
📄nginx.conf Nedir?nginx.conf, Nginx’in ana yapılandırma dosyasıdır. Nginx’in nasıl çalışacağını tanımlar. İçerisinde; genel ayarlar, modül yüklemeleri, log ayarları, include edilen diğer config dosyaları vs. bulunur. Bu dosya olmadan Nginx düzgün çalışmaz. Ayrıca içerisinde, aktif olan configleri include eden bir satır da bulunur.
include /etc/nginx/sites-enabled/*;sites-available Nedir?
Bu dizin, tanımlı tüm sanal host (virtual host) konfigürasyonlarını içerir. Buraya her domain/site için bir config dosyası ekleriz. Ama buraya koymak tek başına aktif etmek anlamına gelmez. Yani “hazır ama aktif değil” gibi düşünebiliriz. Çok doğru bir yaklaşım olmasa da, tek tek domaine özel dosya oluşturmak yerine, direkt olarak sites-available içerisinde bulunan default isimli dosyaya da configler eklenebilir.
root@localhost:/etc/nginx/sites-available# ll
-rw-r--r-- 1 root root 1964 Apr 16 14:12 defaultsites-enabledNedir?
Bu dizin, aktif olan config dosyalarının sembolik linklerini içerir. Burada doğrudan dosya tutmayız, sadece sites-available içindekilerin linki olur. Nginx, sadece sites-enabled/ içindekileri yükler.
Şimdi ise örnek bir domain oluşturup, nginx ile hello world serve etmeye çalışalım:
# kendi domainime ait bir subdomain configurasyon dosyası oluşturuyorum
sudo nano /etc/nginx/sites-available/subdomain.gurkanucar.com
Nginx'in, DSL (Domain-Specific Language) gibi kendine özgü bir konfigurasyon söz dizimi (syntax) vardır. Direkt olarak Nginx tarafından parse edilir. İçerisine aşağıdaki örnek konfigurasyonu ekleyelim:
server {
    listen 80;
    server_name subdomain.gurkanucar.com;

    root /var/www/subdomain.gurkanucar.com;
    index index.html;

    location / {
        try_files $uri $uri/ =404;
    }
}
Oluşturduğumuz konfigürasyon dosyasını linkleyip aktif edelim:
# bu configurasyon dosyasini sites-enabled ile linkleyelim
sudo ln -s /etc/nginx/sites-available/subdomain.gurkanucar.com /etc/nginx/sites-enabled/
# nginx i önce test edip sonra restart edelim
sudo nginx -t
sudo systemctl reload nginx
Domain adımız için, web root dizini oluşturalım. Sonrasında ise içerisine Hello World! yazan bir html dosyası ekleyelim:
# create directory
sudo mkdir -p /var/www/subdomain.gurkanucar.com
# create html file
echo '<h1>Hello, World!</h1>' | sudo tee /var/www/subdomain.gurkanucar.com/index.html
Sonrasında ise kendi DNS sağlayıcımıza gidip, subdomain ve sunucu ip adresimizi ekleyelim:
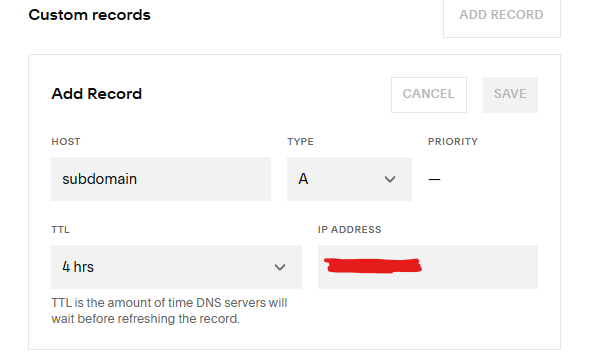
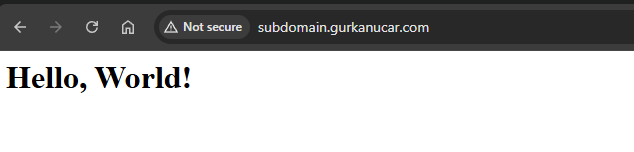
Yukarıda görmüş olduğunuz gibi subdomain ile, oluşturduğumuz Hello World! örneğine erişebildik. Fakat bir sorun var. URL in yanında not secure uyarısını görmektesiniz. Bunu düzeltebilmek için ssl eklememiz gerekmekte.
SSL Sertifikası Ekleme
SSL eklemek için aşağıdaki komutları çalıştıralım ve certbot yükleyelim.
sudo apt install certbot python3-certbot-nginx -y
# enter your email address etc and accept terms
sudo certbot --nginx -d subdomain.gurkanucar.com
Konfigurasyon dosyamıza aşağıdaki komutla girip tekrardan göz attığımızda SSL ile alakalı bazı alanları otomatik olarak geldiğini göreceksiniz:
sudo nano /etc/nginx/sites-available/subdomain.gurkanucar.com

# /etc/nginx/sites-available/subdomain.gurkanucar.com
server {
    server_name subdomain.gurkanucar.com;

    root /var/www/subdomain.gurkanucar.com;
    index index.html;

    location / {
        try_files $uri $uri/ =404;
    }

    listen 443 ssl; # managed by Certbot
    ssl_certificate /etc/letsencrypt/live/subdomain.gurkanucar.com/fullchain.pem; # m>
    ssl_certificate_key /etc/letsencrypt/live/subdomain.gurkanucar.com/privkey.pem; #>
    include /etc/letsencrypt/options-ssl-nginx.conf; # managed by Certbot
    ssl_dhparam /etc/letsencrypt/ssl-dhparams.pem; # managed by Certbot

}
server {
    if ($host = subdomain.gurkanucar.com) {
        return 301 https://$host$request_uri;
    } # managed by Certbot


    listen 80;
    server_name subdomain.gurkanucar.com;
    return 404; # managed by Certbot


}
Ve tekrardan sitemize girdigimizde ise SSL sertifikasinin çalıştığını göreceğiz:
Ek olarak aşağıdaki 2 konfigürasyonun da eklenmesi güveliği artıracaktır:
# SSL Protocols
ssl_protocols TLSv1.2 TLSv1.3;

# HSTS (HTTP Strict Transport Security) activate
add_header Strict-Transport-Security "max-age=31536000; includeSubDomains; preload" always;
TLS 1.3 en guncel sifreleme protokollerinden biridir. HSTS ise bir kez https kullanildiysa her zaman https uzerinden haberlesilmesi gerekliligini saglar
Diğer Türdeki dosyaların serve edilmesi
Diğer türdeki (json, image, zip etc.) dosyaları serve edebilmek için aşağıdaki şekilde konfigüre edelim:
server {
    server_name subdomain.gurkanucar.com;

    root /var/www/subdomain.gurkanucar.com;
    index index.html;

    # Static files
    location / {
        try_files $uri $uri/ =404;
    }

    # JSON files
    location ~* \.json$ {
        add_header Content-Type application/json;
        try_files $uri =404;
    }

    # Images (JPEG, PNG, etc.)
    location ~* \.(jpg|jpeg|png|gif|svg|webp)$ {
        add_header Content-Type image/jpeg;
        try_files $uri =404;
    }

    # ZIP files
    location ~* \.zip$ {
        add_header Content-Type application/zip;
        try_files $uri =404;
    }

    listen 443 ssl; # managed by Certbot
    ssl_certificate /etc/letsencrypt/live/subdomain.gurkanucar.com/fullchain.pem; # managed by Certbot
    ssl_certificate_key /etc/letsencrypt/live/subdomain.gurkanucar.com/privkey.pem; # managed by Certbot
    include /etc/letsencrypt/options-ssl-nginx.conf; # managed by Certbot
    ssl_dhparam /etc/letsencrypt/ssl-dhparams.pem; # managed by Certbot

    # SSL Protokolü ve Ciphers
    ssl_protocols TLSv1.2 TLSv1.3;

    # HSTS (HTTP Strict Transport Security) aktif etme
    add_header Strict-Transport-Security "max-age=31536000; includeSubDomains; preload" always;
}

server {
    if ($host = subdomain.gurkanucar.com) {
        return 301 https://$host$request_uri;
    }

    listen 80;
    server_name subdomain.gurkanucar.com;
    return 404;
}
root@localhost:/var/www/subdomain.gurkanucar.com# ll
total 608
drwxr-xr-x 2 root root   4096 Apr 16 22:29 .
drwxr-xr-x 5 root root   4096 Apr 16 21:55 ..
-rw-r--r-- 1 root root   1182 Apr 16 22:25 data.json
-rw-r--r-- 1 root root     23 Apr 16 21:56 index.html
-rw-r--r-- 1 root root 605766 Apr 16 22:29 istanbul.jpg

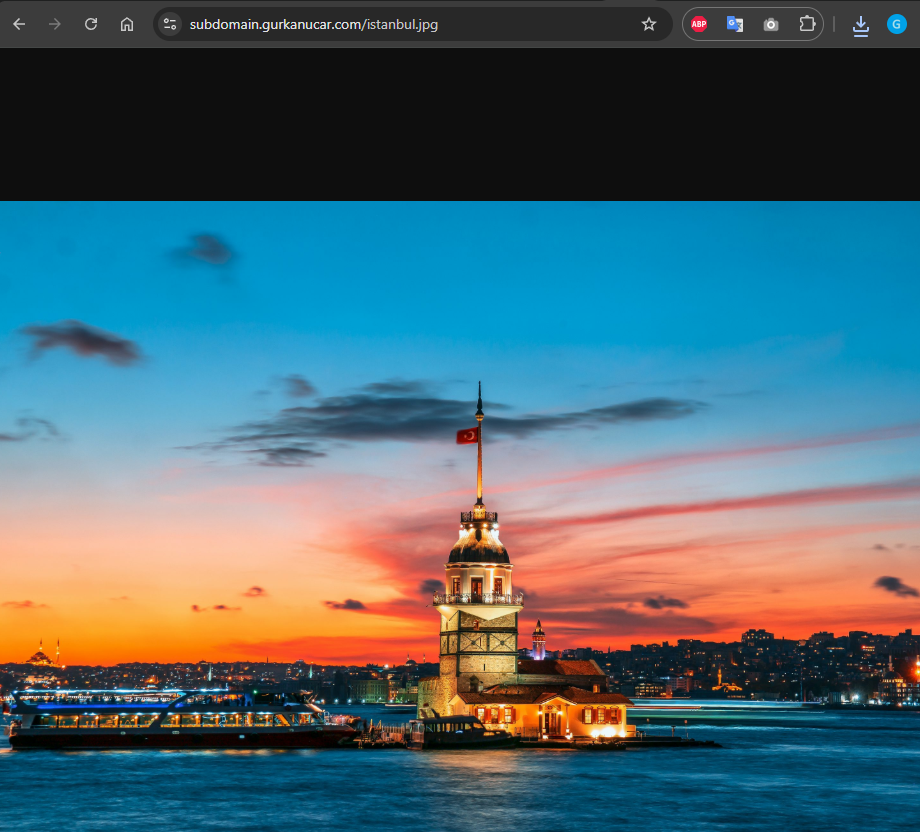
https://subdomain.gurkanucar.com/data.json | https://subdomain.gurkanucar.com/istanbul.jpg
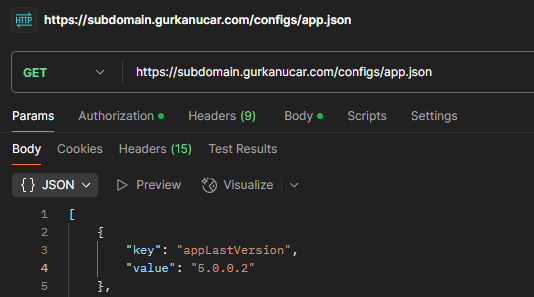
Veya ozel bir konumdaki dosyayi da asagidaki sekilde serve edebiliriz:
    # Custom file
     location = /configs/app.json {
        alias /opt/configs/app.json;
        add_header Content-Type application/json;

        # Cors config - optional
        add_header 'Access-Control-Allow-Origin' '*' always;
        add_header 'Access-Control-Allow-Methods' 'GET, OPTIONS' always;
        add_header 'Access-Control-Allow-Headers' 'DNT,User-Agent,X-Requested-With,If-Modified-Since,Cache-Control,Content-Type,Range,Authorization' always;

        # cache - optional
        expires 5m;
        add_header Cache-Control "public";
} 
NodeJS web sunucu uygulamasina yonlendirme
Simdi ise basit bir node js uygulaması oluşturalım ve gelen istekleri oraya yönlendirelim.
const express = require('express');
const app = express();
const port = 3000;

// Fake response
app.get('/api', (req, res) => {
    res.json({
        message: "Hello, World!",
        data: {
            id: 1,
            name: "John Doe",
            email: "john.doe@example.com"
        }
    });
});

// Start server
app.listen(port, () => {
    console.log(`Server running at http://localhost:${port}`);
});
subdomain.gurkanucar.com config dosyasindaki server bloklari arasina aşağıdaki kodu ekleyelim:
server {
    server_name subdomain.gurkanucar.com;

    root /var/www/subdomain.gurkanucar.com;
    index index.html;

    ..............

   # Proxy requests to Node.js app
    location /api/ {
        # Note the trailing slash!
        proxy_pass http://localhost:3000/; # Node.js uygulamanın çalıştığı port
        proxy_set_header Host $host;
        proxy_set_header X-Real-IP $remote_addr;
        proxy_set_header X-Forwarded-For $proxy_add_x_forwarded_for;
        proxy_set_header X-Forwarded-Proto $scheme;
    }

...............
Ardindan nginx restart edelim
nginx -t && sudo systemctl reload nginx
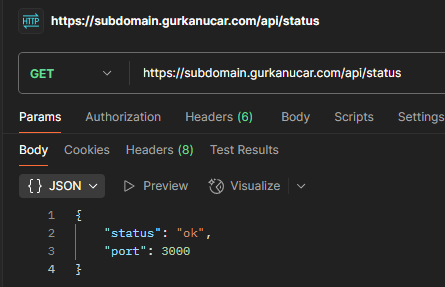
Görmüş olduğunuz üzere https://subdomain.gurkanucar.com/api adresi uzerinden servisimize erişebildik.
Peki websocket de eklemek istersek ne yapmalıyız?
Websocket eklemek için Nginx tarafında ufak bir güncelleme yapmak gerekecek. Once uygulamaya websocket ekleyelim:
// app.js - Express with WebSocket implementation
const express = require('express');
const http = require('http');
const WebSocket = require('ws');

const app = express();
const server = http.createServer(app);
const wss = new WebSocket.Server({
    server,
    path: '/api/ws' // WebSocket endpoint under the /api path
});

const port = 3000;

// Express REST API endpoint
app.get('/api', (req, res) => {
    res.json({
        message: "Hello, World!",
        data: {
            id: 1,
            name: "John Doe",
            email: "john.doe@example.com"
        }
    });
});

// WebSocket connection handling
wss.on('connection', (ws) => {
    console.log('Client connected');

    // Send welcome message
    ws.send(JSON.stringify({
        type: 'welcome',
        message: 'WebSocket connection established'
    }));

    // Handle messages from client
    ws.on('message', (message) => {
        console.log('Received:', message.toString());

        // Echo the message back
        ws.send(JSON.stringify({
            type: 'echo',
            message: message.toString()
        }));
    });

    // Handle client disconnection
    ws.on('close', () => {
        console.log('Client disconnected');
    });
});

// Start server
server.listen(port, () => {
    console.log(`Server running at http://localhost:${port}`);
    console.log(`WebSocket server running at ws://localhost:${port}/api/ws`);
});
Ardindan nginx konfigurasyonunu güncelleyelim:
    # Combined API and WebSocket configuration
    location /api/ {
        # Note the trailing slash!
        proxy_pass http://localhost:3000/; # Node.js application port

        # Enable WebSocket support
        proxy_http_version 1.1;
        proxy_set_header Upgrade $http_upgrade;
        proxy_set_header Connection "upgrade";

        proxy_set_header Host $host;
        proxy_set_header X-Real-IP $remote_addr;
        proxy_set_header X-Forwarded-For $proxy_add_x_forwarded_for;
        proxy_set_header X-Forwarded-Proto $scheme;
        proxy_read_timeout 86400; # Timeout for WebSocket connections (24h)
    }
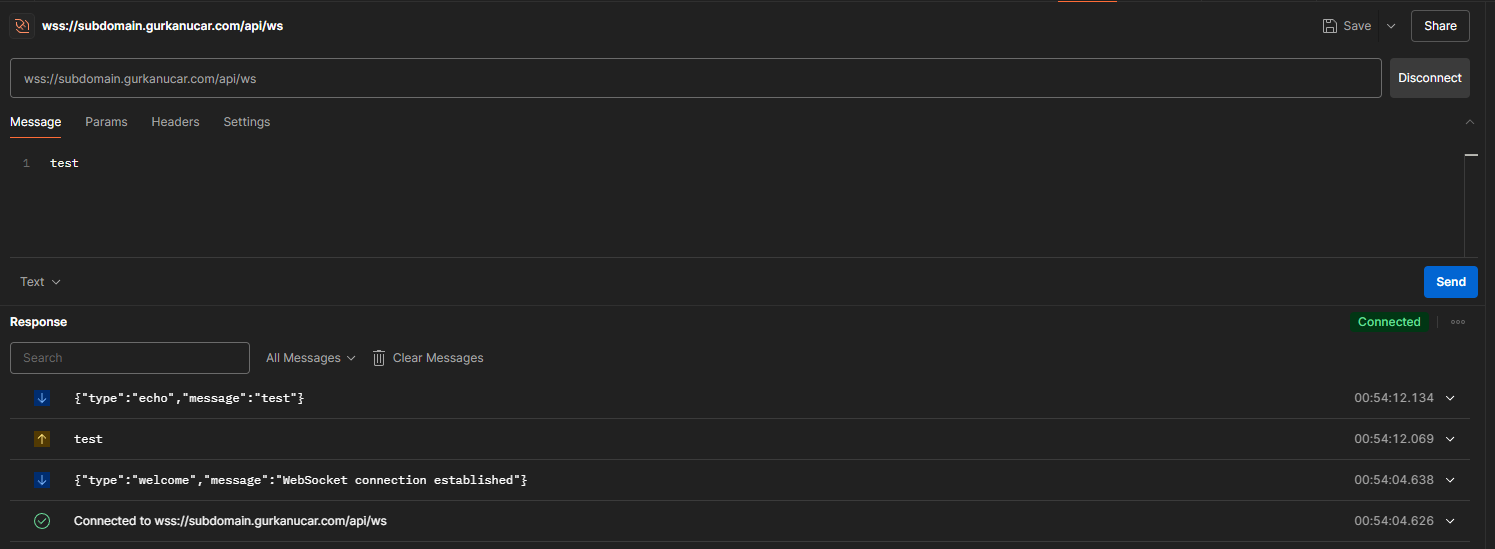
Görmüş olduğunuz üzere websocket de başarılı bir şekilde çalıştı.
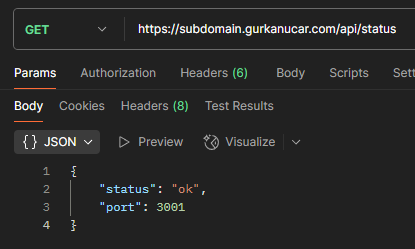
Load Balancing
Nginx in en önemli özelliklerinden bir diğeri ise load balancing yapabilmesi. Load balancing, gelen istekleri uygulama node larına dağtımak ve performansı artırmak anlamına gelmektedir. upstream kullanarak nginx de load balancing yapabiliriz.
Upstream tanimlamasini, server bloğunun üzerinde gerçekleştirmeliyiz. Ardindan az önce tanımladığımız 3000 portlu proxy pass'ı (proxy_pass http://localhost:3000;) upstream ile degistirmeliyiz.
# load balancing
 upstream backend_servers {
      server localhost:3000;
      server localhost:3001;
      # You can add more servers here if needed
  }

server {
    server_name subdomain.gurkanucar.com;
    ..........

        # Proxy WebSocket and API requests
    location /api/ {
         proxy_pass http://backend_servers/;  # Load balancing

...........
}
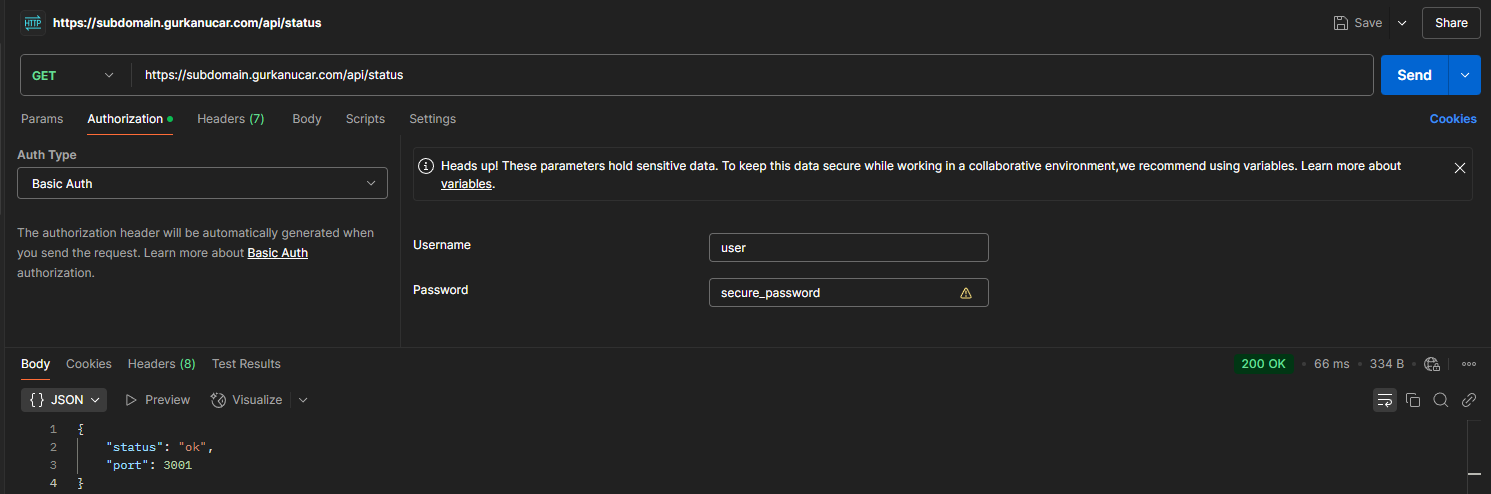
Şimdi ise bazen 3000 bazen 3001 portuna yönlendirmekte:
Load Balancing
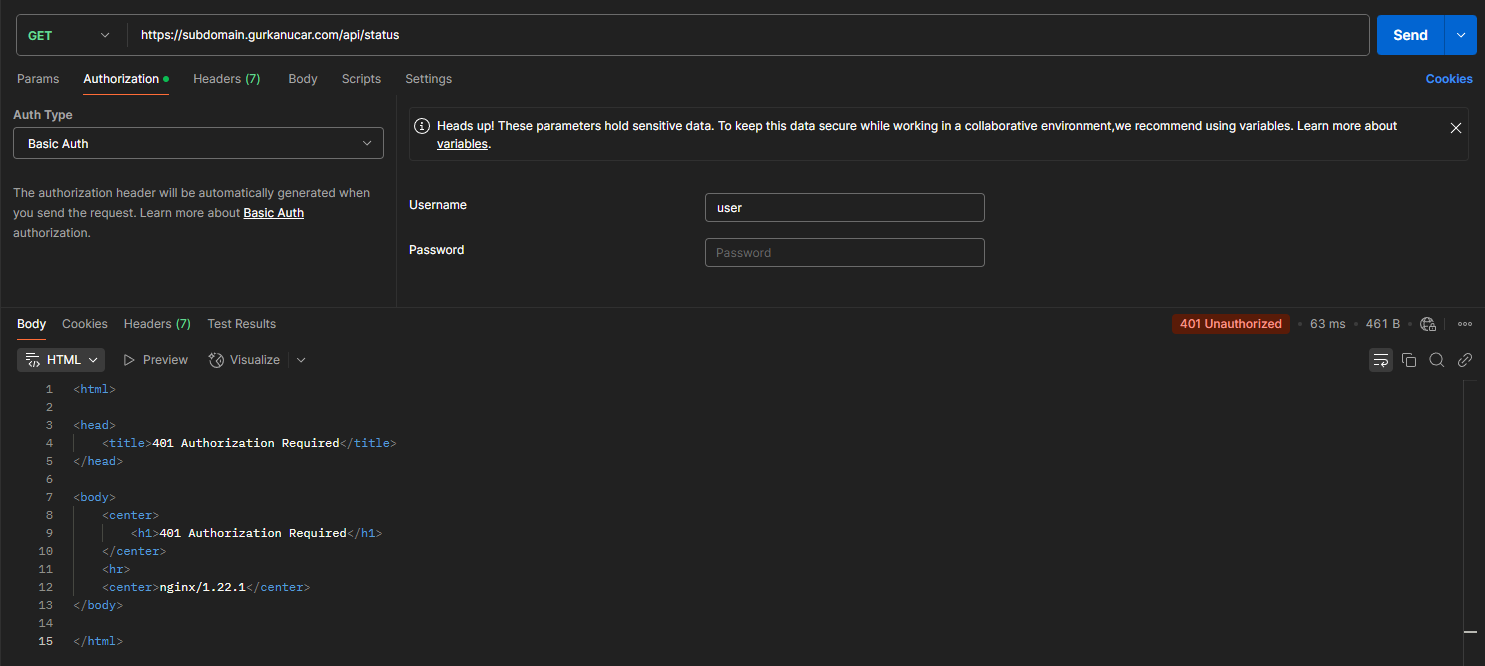
Basic authentication her ne kadar cogu zaman web uygulama sunucusunda eklense de, nginx ile de ekleyebilmek mumkun. Ornegin bazi docker servislerimizi dis dunyaya acarken onune basic authentication eklemek isteyebiliriz.
Basic authentication icin htpasswd ile username ve password olusturmak gerek. Asagidaki sh dosyasi ile bunu kolayca halledebilirsiniz.
#!/bin/bash

if ! command -v htpasswd &> /dev/null; then
    echo "Installing apache2-utils to use htpasswd..."
    apt-get update
    apt-get install -y apache2-utils
fi

# Set username and password
USERNAME="user"
PASSWORD="secure_password"

echo "Creating password file for user: $USERNAME"
htpasswd -cb /etc/nginx/.htpasswd $USERNAME $PASSWORD

chown www-data:www-data /etc/nginx/.htpasswd
chmod 600 /etc/nginx/.htpasswd

echo "Basic authentication setup complete!"
echo "Username: $USERNAME"
echo "Password: $PASSWORD (Please change this in production!)"
echo "Password file location: /etc/nginx/.htpasswd"
echo ""
echo "To manually create/update users, use:"
echo "  htpasswd -c /etc/nginx/.htpasswd username  # Create new file"
echo "  htpasswd /etc/nginx/.htpasswd username     # Add/update user"
Ardindan basic authentication eklemek istedigimiz servise:
       # Basic Authentication
        auth_basic "Restricted Access";
        auth_basic_user_file /etc/nginx/.htpasswd;
satirlarini ekleyelim. Ornegin:
location /api/ {
        # Basic Authentication
        auth_basic "Restricted Access";
        auth_basic_user_file /etc/nginx/.htpasswd;
      proxy_pass http://backend_servers/;  # Load balancing

        # Enable WebSocket support
        proxy_http_version 1.1;
        proxy_set_header Upgrade $http_upgrade;
        proxy_set_header Connection "upgrade";
        proxy_set_header Host $host;
        proxy_set_header X-Real-IP $remote_addr;
        proxy_set_header X-Forwarded-For $proxy_add_x_forwarded_for;
        proxy_set_header X-Forwarded-Proto $scheme;
        proxy_read_timeout 86400; # Timeout for WebSocket connections (24h)
  }
- nginx performans onerileri / performance tunning